-
LSD Exclusive
- Nationwide Delivery
Nearly all full pack prices include delivery to most of the UK within 3-5 working days. Extras available:
- Next day delivery
- Saturday delivery
- AM delivery
- Split Packs
We split packs of paving to save you money and to cut down on wastage. Remember to buy 10% more though for cuts and breakages!
Look out for the below icons to show if we split packs.
- Bespoke Cuts
Custom made, bespoke natural stone products
- Garden Ideas
- Advice & Guides
Suppliers guides and design software
The Ultimate Decorative Aggregate Guide
-
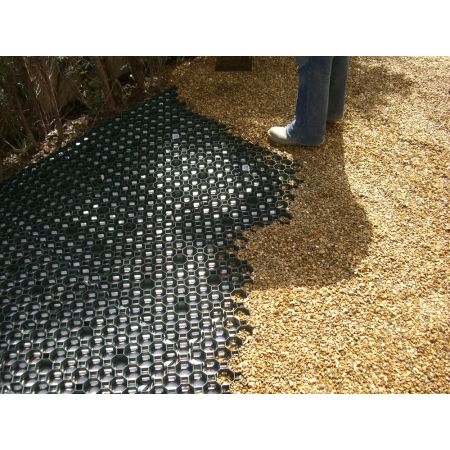 Aggregate Matting - Plastic Porous Paving Gridding System - SUDS Compliant£16 .20 per bundleinc VAT
 -
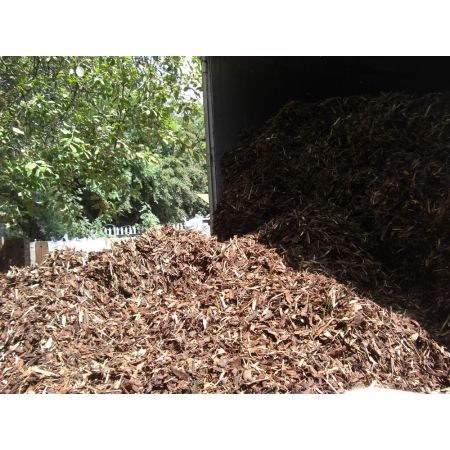 Decorative Bark Chippings - Spruce - Bulk Bag£196 .56 per baginc VAT
 -
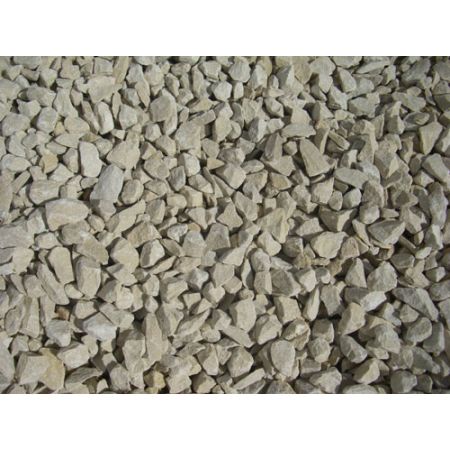
 Youlgreave Carbon Limestone - 20mm - Bulk Bag£126 .48 per baginc VAT
 -


Decorative stone helps structure and landscape your garden for a professional looking finish. A gravel garden is ultra low maintenance and is a perfect way to make your garden look fantastic whilst reducing garden upkeep – no time has to be spent treating, mowing or cutting a lawn and it deters weeds too!
This guide will show you, step by step, how to lay a gravel garden and we will help you choose the right stone to suit your needs; whether it’s for weed control, protection against frost, drainage, a driveway or style.

How to Lay Decorative Aggregates
1. Clear The Area
Firstly, you will need to clear the whole area where you will be laying your gravel or slate chippings. Remove all vegetation and loose material around the garden area – you really need to be thorough here, using weedkiller on any deep-rooted weeds to make sure your finished garden landscaping remains weed free.
2. Level the Ground
Once you have uprooted the weeds and vegetation, level the area out using a steel rake. This should bring up any small items such as rocks, twigs and leaves. Keep raking and removing these items and create a smooth flat and levelled area.
3. Lay a Weed Control Membrane
We highly recommend using a semi permeable membrane over the area to help reduce weeds – our heavy duty weed control membrane allows water and air nutrients to permeate the ground and helps maintain healthy and fertile soil underneath, whilst helping with weeds and contributing to keeping a low maintenance garden.
You will need to lay the membrane to a depth suitable for the type of decorative stone you are using – for a garden this is generally 40mm for the smaller 10mm aggregates, 50mm for medium aggregates from around 20mm in size and large cobbles and rocks will usually require around 100mm of depth. If you check the ‘Additional’ tab on our product descriptions, there will be a recommended depth listed on each specific listing.
If you need multiple sheets to cover a large area you will need to overlap the membrane, with a minimum of a 50mm overlap between sheets - the pack will give a recommended minimum overlap amount too if you're not sure. You will also want to leave extra material around the borders, to reduce the likelihood of weeds coming up around the edges.
4. Creating Room for Plants using a Weed Membrane
If you are planning on adding plants in the area, such as along a border, you’ll first need to plan out where your plants or shrubs are going to be located. Once you’ve decided on positioning, create an X shaped cross cut through the membrane, keeping the incision as small as possible for the plant size. You want to avoid cutting out any fabric here to minimise the chance of weeds coming through – with a cross shaped cut you can lay the flaps back down around the base of the plant, making a much tighter seal, which you wouldn’t get with cutting out a section of the membrane.
Now you can simply separate the flaps to access the soil, ready to be dug up to make room for your chosen plant. Once you’ve planted your new shrub or flower, use the soil you removed to fill in the area, making sure the excess soil doesn’t end up above the membrane. Once planted, simply pop the flaps back over and secure around the base of the plant.
TOP TIP: Of course, if you don’t want the hassle of planting within the area, you can just add potted plants on top of the decorative stone to keep your garden extra low maintenance!
5. Laying Slate Chippings, Stones or Gravel
You will want to lay your decorative stones to a depth of around 40-50mm for the best coverage, but this measurement will generally depend on the size of the decorative aggregate used. Once your gravel or chippings are down, use a rake or similar to create a flat and even finish. To help reduce movement in your decorative stone you can create a barrier around the edge, either using larger stones, timber or stone edging.This will also help reduce the likelihood of your membrane moving around or weeds poking up around the edge.
How Much Gravel or Slate Chippings Will I Need?
The amount required for your garden will vary based on stone size and area to be covered. Our bulk bag of gravel or decorative aggregate usually contains around 900kg of stone which covers roughly 9m2 of area at a depth of 50mm / 2 inches. Quick Reference: A rule of thumb is 1000kg = 10m2 (5m x 2m) at 50mm deep
What Type of Decorative Aggregate Should I Use?
There are many types of decorative stone you can use for your garden landscaping project, all which suit different areas of the garden and have different benefits. There is plenty of choice, with different sizes and material types available. We’ve gathered list of the most common garden aggregates with recommendations on usage and the benefits of each.
Slate
Slate is a completely natural product and is an extremely versatile decorative aggregate. It comes in three main colours, plum, green and the popular blue slate. It comes in a wide range of sizes and can be used almost anywhere in the garden, including plant pots, pathways, borders, rockeries, driveways and even in water features and fish ponds. Most slate can be used in or near water features as it doesn’t generally affect the pH of the water, so will be safe for use near aquatic life. Algae does not form as quickly on slate as on block paving or concrete which is a plus for using slate in wet areas.
Slate does darken in colour when wet – we think it gives the garden an extra something when it rains but you might want to bear this in mind if you are picking it for a specific colour scheme for your garden. Slate helps keep unwanted weeds at bay by blocking the sunlight in areas where weeds are more likely to take hold. Not only does it help with weeds, slate chipping also helps soil retain moisture too.

Slate Size & Usage Guide
Slate Mini Mulch
Slate mulch is the finest type, measuring around 2 – 14mm and is ideal for using in planters, for pathways and in the garden. We don’t recommend using this for a driveway however, as it does break easily under the weight of a car.
We recommend – Our most popular mini much is the 2-14mm Plum & Blue Mini Mulch bulk bag
Slate Chippings
Chippings are typically around 20-40mm in size, and can be used pretty much anywhere in the garden. If you use the larger 40mm slate chipping you can even use slate on a driveway.
Slate Paddlestones
Our slate paddlestones measure 50-100mm, and are tumbled to create a smooth finish. Due to their large size, these stones are easy to walk on and are great for an unusual garden path. They also work well in water features, as water runs across them smoothly due to their polished surface. Due to their large size, we wouldn’t recommend using these on a driveway.
We recommend; 50-100mm Plum Slate Paddlestones
Flint
Flint is a hard form of quartz and generally has a wide spread of golden colours within it, generally including a range of whites, blacks, oranges, browns and creams. It is an extremely hard, long-lasting and durable aggregate which we stock in 10mm and 20mm variations. Due to it’s hard wearing qualities, flint gravel makes a great surface for driveways – we generally recommend using the 20mm size for this as the size and angular shape of the flint lock together when driven on, creating a more stable surface.
We recommend; 20mm Solent Gold Beach Pebbles which has tiny little shells mixed in amongst the stone. 10mm flint is perfect for garden paths and walkways due to it’s angular locking properties as it is less likely to get stuck in your shoe tread or washed away in heavy rain. You can also use it in plant pots We recommend:
Pebbles
A round and smooth look, pebbles make a great covering for flowerbeds or for adding contrast within a rockery. Marble, Dolomite and Quartz are popular materials for pebbles, which come in a wide range of colours, including bright white, grey, golden and even black. Their smooth shape and colour options make them great for adding contrast within a garden. Bright white pebbles make a brilliant plant border, especially if you have brightly coloured flowers and plants to contrast against.

Rockery
Rockery stone can add structure and interest to your landscaping. It comes in varied sizes, from around 150mm to 450mm and is mainly used for decorative purposes in the garden. A rockery can really make a striking garden feature – we love rockery stone placed around a small planted area, or used for raised bedding.

Paddlestone
Paddlestones are a flat and generally smooth stone that come in sizes from 50mm to 140mm. They can also be stacked due to to create an interesting and unusual decorative feature. Stone paddlestones are usually made from schist or quartz, which are great for borders, features and plant pot toppers, and you can also get paddlestones in slate. Slate paddlestones are pH neutral, which make them ideal for use in water features and around aquatic life. Our slate paddlestones come in a smaller 50-100mm size and are easy to walk on due to their flat surface. Thanks to their dark colourings, they can make an unusual and striking garden path too.

We recommend; These extra large Stonemarket Pacific Paddlestones come individually and make a great stacked stone feature
Gravel & Shingle
Gravel or shingle are small and irregular pieces of rock and covers a wide range of material and stone types. Gravel can be angular or smooth and is made from varied materials, including limestone, granite and quartz. It’s also known as shingle, pea gravel, buff and chippings. Gravel typically ranges from 6mm-20mm in size. The smaller sizes are ideal for pathways and decorative purposes, such as around borders or as plant pot toppers to protect against frost. The larger 20mm stones are suited to paths and driveways, dependant on the material.
Cotswold Chippings & Cotswold Buff
This type of gravel is made from naturally formed limestone and is angular in shape and light in colour, typically coming in creams and greys. You may need to avoid using limestone chippings if you are wanting to use this around plants that thrive in more acidic soils though, so do bear this in mind. This stone is suitable for driveways and pathways as it settles flat and is kinder on wheels and feet. We love the colour of this Cream Cotswold Buff and our best selling Cream Limestone Chippings

Garden Inspiration
We've asked the professionals their tips for integrating decorative aggregates into the garden and giving you the gravel garden of your dreams;
Using a variety of textures within your garden creates interest. Installing an aggregate, such as cobbles or pebbles, inbetween paving slabs is a great way to add texture. Mix textures up - rough with smooth, soft with hard, shiny with matt - to add contrast and excitement”
Katrina - Earth Designs
In this garden design, Katrina has used gravel as a borden across wooden slats and the hard stone slabs, using a mix of both colours to bring the garden together in harmony and giving interest through the use of three different materials and textures.


Paul highlights the benefits of using decorative aggregates in his townhouse garden design;

The townhouse garden lent itself to using a small washed cobble gravel on the paths and into the border areas. It’s a very natural product, soft on the eye, easy to use and lay and cheaper than paving. It makes for a great mulch when used in gravel gardens having the two-fold effect of helping to suppress weeds and holding moisture in the beds. Any weeds that do come through are easily removed as they tend to root within the gravel, thus making them easy to weed out!
Paul Baines Garden Design MSGD


He also gave advice on laying a gravel path;
"For gravel paths I find it best to lay a type 1 mot sub-base, blinded with 25mm hoggin and 25mm gravel then laid on top and compacted down with a whacker plate. So often gravel is laid too thickly making it very hard to walk on"